Monday, July 20, 2009

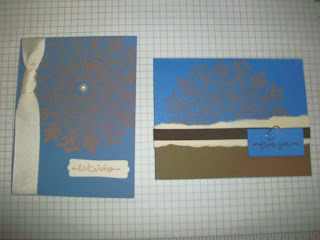
Wanted Birthday


This is a card that I made for my sister's birthday. She is loves western motif and is a sort of cowgirl at heart. I used the criss cross card tutorial on SCS. I wasnt too sure what I was going to do with this set but I absolutely love the way it turned out and I think that she will too.
recipe:
stamp sets: Wanted & Happy Everything
paper: creamy caramel, bashful blue, very vanilla & really rust
ink: very vanilla craft, bashful blue & chocolate
accessories: scallop punch, 1 1/2 circle punch, brad, choc. chip ribbon, tab punch & twine, texturz plate #4

Thursday, July 16, 2009

Medallion (again....sorry) Thank You


Sorry...we have another medallion! Which is just crazy because I fell in love with this stamp as soon as I saw it and then got it and looked at it for a week and didnt know what to do with it. Pretty much what I do with all of my stamp sets...hehe. So I sat down to do the card set I posted a few days ago and now I just cant stop using it. I love it!!!!
I hope you do too!!!!
Recipe:
Paper: Melon Mambo & Chocolate Chip
Ink: Creamy Caramel Craft & Chocolate Chip
Accessories: Creamy Caramel Ribbon, Pretties Kit Flower and pearl &
scallop circle punch to make choc. chip flower in the center
Stamp Sets: Medallion & Short & Sweet

Wednesday, July 15, 2009

Box In A Bag Tutorial

Woohoo! My first tutorial. I hope that it is easy to follow. Any comments, helpful hints, etc. would be very much appreciated. I want to make them as easy to follow as possible. Enjoy!

supplies:
4 1/2 x 4 1/2 cardstock
2 x 11 cardstock
5 1/2 x 11 DSP
sticky strip
scallop punch
tab punch
ribbon & accessories (optional)


1. - score 4 1/2 x 4 1/2 cardstock @ 1" on all 4 sides & burnish with bonefolder. Cut along scoreline on 2 sides to create tabs as shown.


2. - place sticky strip on back of tabs and fold up to create the box for the bottom of the bag.


3. - turn your 5 1/2 x 11 DSP over to the back and place sticky strip along bottom and up 1 side as shown.


4. - peel sticky strip from back of DSP. take the box made in steps 1 & 2 and roll along the bottom until completely wrapped around. peel sticky strip from the side of the DSP & overlap where you started it on the box to create your bag.


5. - use your scallop edge on the 2 x 11 piece of cardstock to create the decorative bottom. place your sticky strip exactly as you did in step 3. peel and wrap around the bottom of your bag the same way as your DSP in step 4.


6. - punch 2 tabs with your tab punch and then punch holes in both tabs. attach to the top of your bag and tie ribbon. Accessorize as desired!

Tuesday, July 14, 2009

Dollar Daze


Everyone loves a bargain!!! Woohoo! Everything you see here was bought on the dollar aisle! You cant get any better than that! So cheap and so easy to do and what great gifts.

Monday, July 13, 2009

Not So Blue Box Set


Happy Monday! I hope that everyone had a great weekend. As you can see... I was busy stampin' away! I decided to make a whole card set using the Medallion stamp set and the Short and Sweet sentiment set. I also wanted to keep it to one color scheme. So I stuck with browns and blues (all of them....hehe). There is a card for every occasion in this set. I had no idea that the medallion would turn out to be sooooo versatile. What a pleasant suprise. This is going to be the project for my August stamp camp. So send me an email @ jhudson.stampin@live.com or leave me a comment with your info if you like to join us!

Friday, July 10, 2009

New Circle Circus


Happy Friday! This is the card that I made for my very first card swap. It was with my SU! group...glitterchicks. All cards were made from the sneek peak sets for the new catalog. I chose the circle circus set. I decided to make another tree because the seeing spots set was so popular when I posted that one and it is now retired. I think I found a set that will fill it's shoes nicely...hehe. I also made the swing with the sentiment out of the new modern label punch. I love the way it turned out. I hope you all like it!!
Recipe:
paper: dusty durango, very vanilla, crushed curry & soft suede
ink: soft suede & bermuda bay (flowers - melon mambo, dusty durango)
accessories: modern label punch, eyelets, dazzling diamonds, scallop circle punch, and just about all sizes of the circle punches

Thursday, July 9, 2009

Blog Candy!!!!

Hey Everyone! I dont have time to do a project to post today but I thought you would like to know about some amazing blog candies!!!! Go to www.stampwithann.blogspot.com & not only does she have a giveway but links to a lot of other amazing giveaways. Good Luck & happy Thursday!

Wednesday, July 8, 2009

Hostess gift


This is one of my favorite hostess bags to make! It is so much fun and so easy. I used the raspberry tart dsp (now retired!..sniff, sniff) and cameo coral. The flower is made with the daisy die for the big shot. I used a template I found on Toni Sacrison's blog @ http://5inkyfingers.blogspot.com . It is so easy to follow and I cant wait to have this as a project for one of my clubs.

Monday, July 6, 2009

Thinking of You

Many of you who know me know that I am a military wife. A lot of my projects are things I have made for my husband and well....this is no exception. I love my top note die and have a hard time throwing out the scraps that it leaves so with many of them sitting around I wanted to try to use at least one of them. So I decided to make a card. I used the Branch Out stamp set (now dormat) and the greeting from the Bird on a Branch stamp set. I made the ribbon (yellow ribbon for troop support) out of a little scrap of paper laying around. It was so easy and quick but I was really suprised and very pleased with how it turned out!